When it comes to hairstyling for little girls, creativity knows no bounds. One of the charming and versatile options in the world of kids’ hairstyles is the use of rubber bands. These “Little girl rubber band styles” offer a plethora of possibilities to create cute, practical, and unique looks that can match any occasion.
From playful pigtails to intricate braids adorned with colorful rubber bands, parents and guardians have the opportunity to make their little ones feel special while keeping their hair neat and stylish. In this guide, we’ll explore some adorable and practical rubber band hairstyles for little girls that can add a touch of flair to their daily routine or make them the center of attention at a special event.
Top 40+ Little girl rubber band styles 2023
Golden Braided High Bun
The braided high bun is a popular and fashionable hairstyle for girls. It’s great for special occasions such as weddings, parties, or school dances, but it can also be worn casually.
To create this look, begin by brushing the hair and forming a high ponytail. Then, braid the ponytail and wrap it around the base to form a bun. Use bobby pins to secure the bun in place and finish with hairspray to keep everything neat. This hairstyle offers versatility and can be personalized with various types of braids, like fishtail or Dutch braids. Adding ribbons or hairpins can also infuse a fun and unique touch to the style.
For a Blonde Braided High Bun like the one pictured, you can draw inspiration from the Ghana braids hairstyle trend. This hairstyle suits any occasion, whether it’s a casual outing or a formal gathering.

Crisp Twisted Hair with Elastic Bands
To add a playful and effortless touch to your hair, consider trying out these charming rubber band hairstyles with fresh twists. They’re suitable for young girls and can be flaunted at various settings, be it work, school, or a party. Here’s how you can achieve these hairstyles:
- Start with clean, tangle-free hair. You can elongate your hair using a blow dryer or the banding method to enhance its length and definition.
- Divide your hair into sections based on the design you desire. You have the freedom to choose from patterns like criss-cross, straight-back, or any creative design that appeals to you.
- Apply some gel or pomade to each section and secure it with a rubber band. Ensure that the rubber bands are neither too tight nor too loose.
- Twist each section of hair using your fingers or employ a twisting tool for more uniform twists. If you desire additional length and volume, you can use extensions.
These hairstyles are easy to maintain and can last for up to two weeks with proper care. Simply wrap your hair with a silk scarf before bed and moisturize your scalp and edges as needed. For added fun and style, you can accessorize your twists with beads, clips, or scarves.
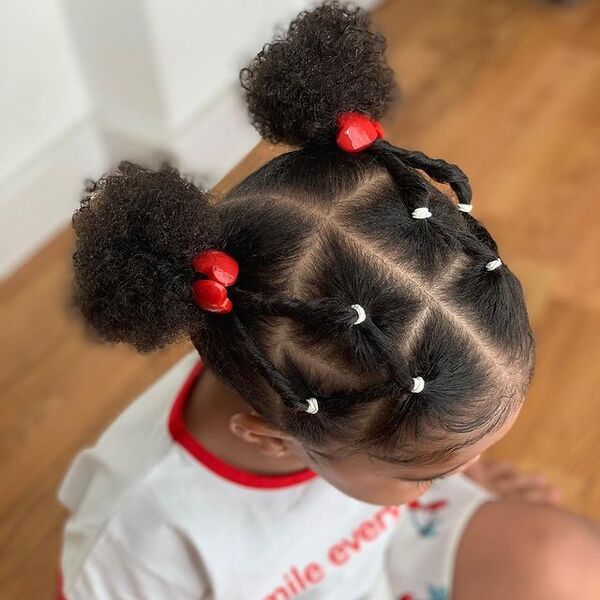
Twin Bun Accented with Rubber Bands
Creating a twin bun hairstyle with rubber bands is a quick and chic option suitable for medium to long hair. This versatile style works well for both casual and formal occasions. Follow these steps to achieve a twin bun with rubber bands:
- Begin by brushing your hair and dividing it into two equal sections.
- Secure each section into a high ponytail using a rubber band.
- Twist each ponytail around its base and fasten it with another rubber band.
- Conceal the ends of the hair by tucking them under the bun and use bobby pins if necessary.
- You have the choice to leave some strands of hair loose for a messy look or smooth them with a comb for a sleek appearance.
- To add a playful touch, consider accessorizing your buns with clips, bows, or flowers.
For a fun and youthful twist on the traditional double bun style, experiment with incorporating colorful rubber bands into your hairdo. Explore these hairstyle ideas for 10-year-old black girls to gather inspiration on how to incorporate rubber bands in a stylish and age-appropriate manner.
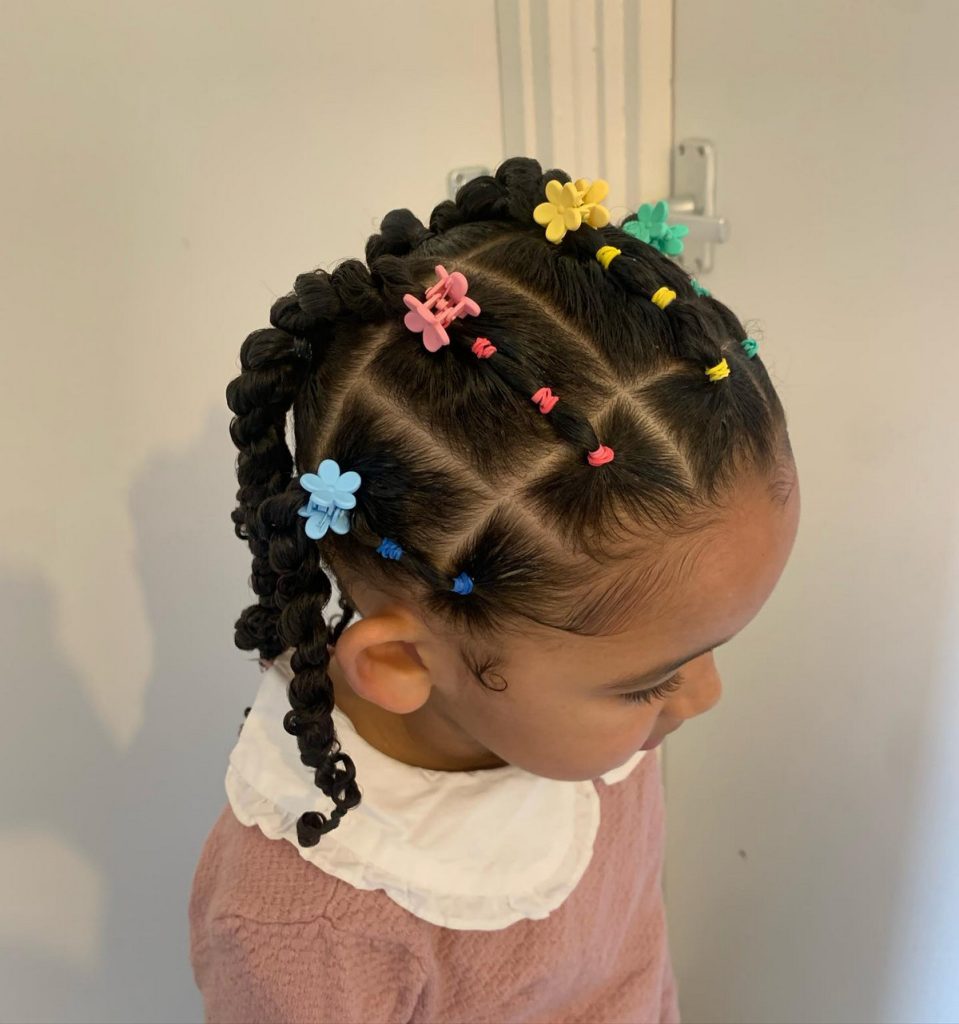
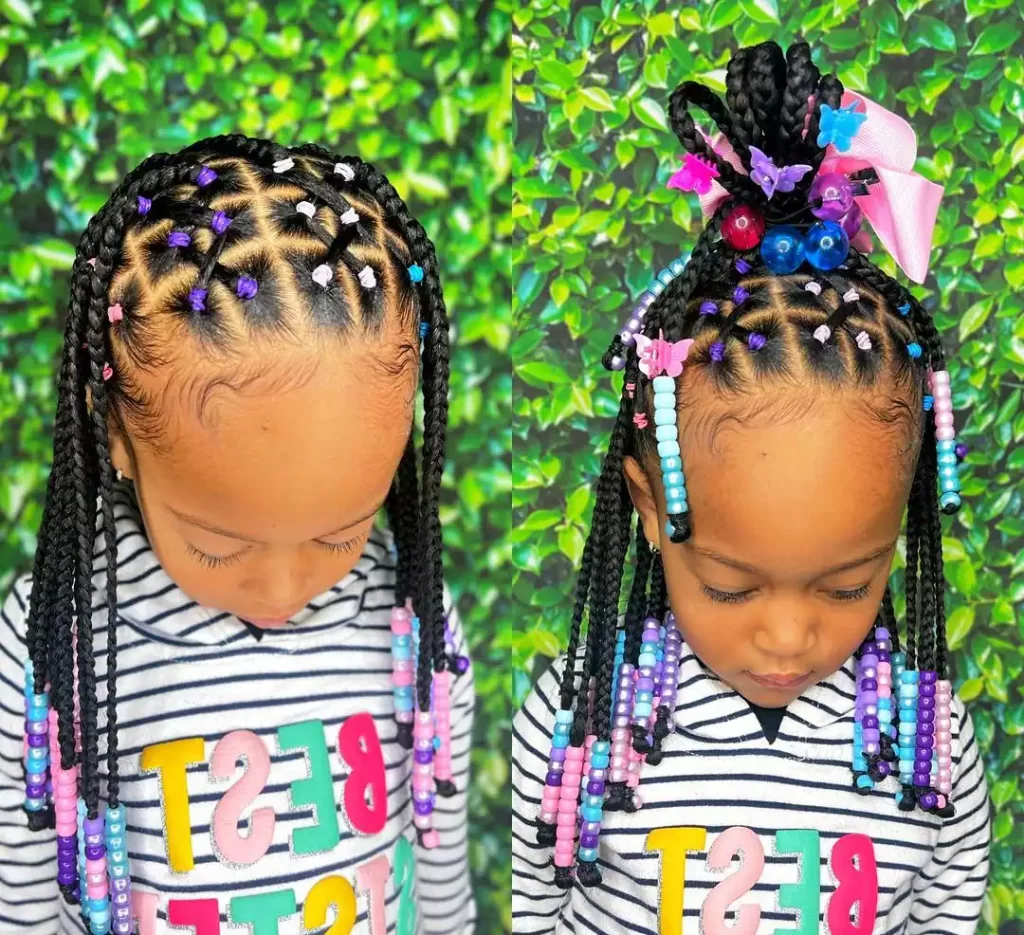
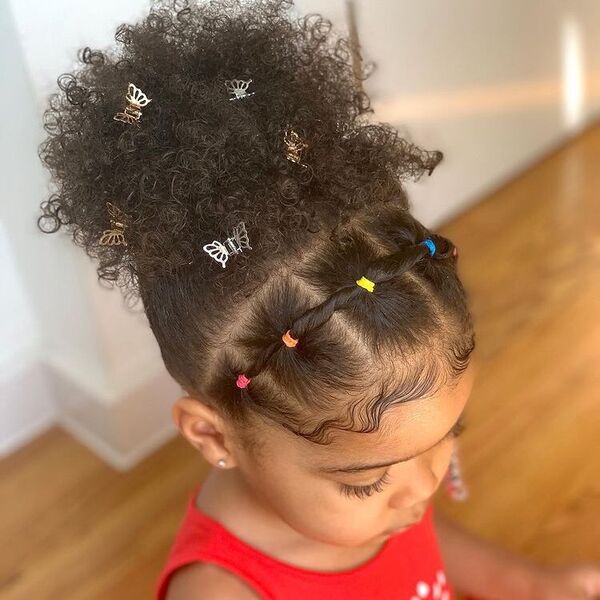
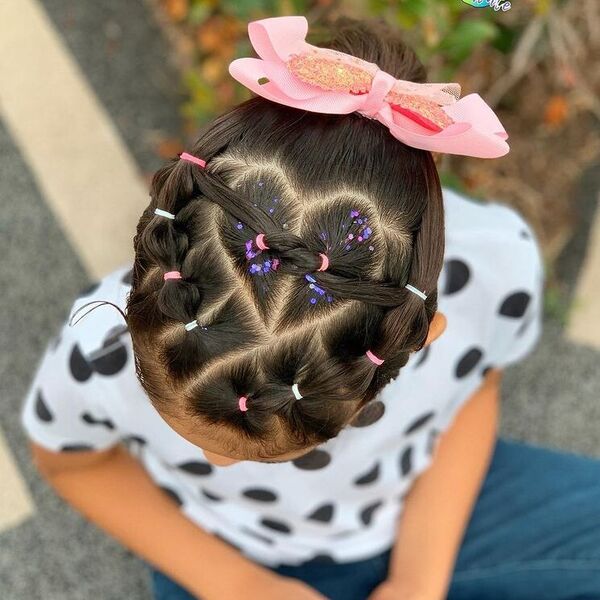
Playful Rubber Bands and Butterfly Hairstyle
If you’re seeking a playful and uncomplicated way to adorn your adorable hair, consider giving the rubber bands with butterfly hairstyle a try. This charming and vibrant hairstyle entails using small rubber bands to section off portions of your hair and then embellishing them with butterfly clips.
It’s an ideal hairstyle choice for casual outings, parties, festivals, or simply to add some fun to your look. You can get creative by experimenting with various colors and sizes of rubber bands and butterfly clips to craft distinct and captivating styles.

Chic Side-Parted Rubber Band Hairdos
For a simple yet stylish hairdo, consider side part rubber band hairstyles. They’re versatile and suitable for any occasion. Follow these steps:
- Begin by creating a clean side part in your hair using a comb or your fingers.
- Take a small front section of hair from the part and secure it with a close-to-scalp rubber band.
- Combine another small section of hair from behind the first one and secure it with another rubber band to create a loop.
- Continue this process until you reach the back of your head, leaving the remaining hair loose or tying it in a ponytail or bun.
- To add flair, use accessories like clips, bows, or beads for a fun and colorful touch.
Side part rubber band hairstyles work well for all hair types and lengths. They keep your hair out of your face and add texture and dimension to your look. Try them out to see how they can transform your appearance!
For a more edgy and bold twist to your side part rubber band hairstyles, explore Baddie Hairstyles. These styles effortlessly blend chic and daring elements, allowing you to experiment with color and texture for a unique look that suits your style.
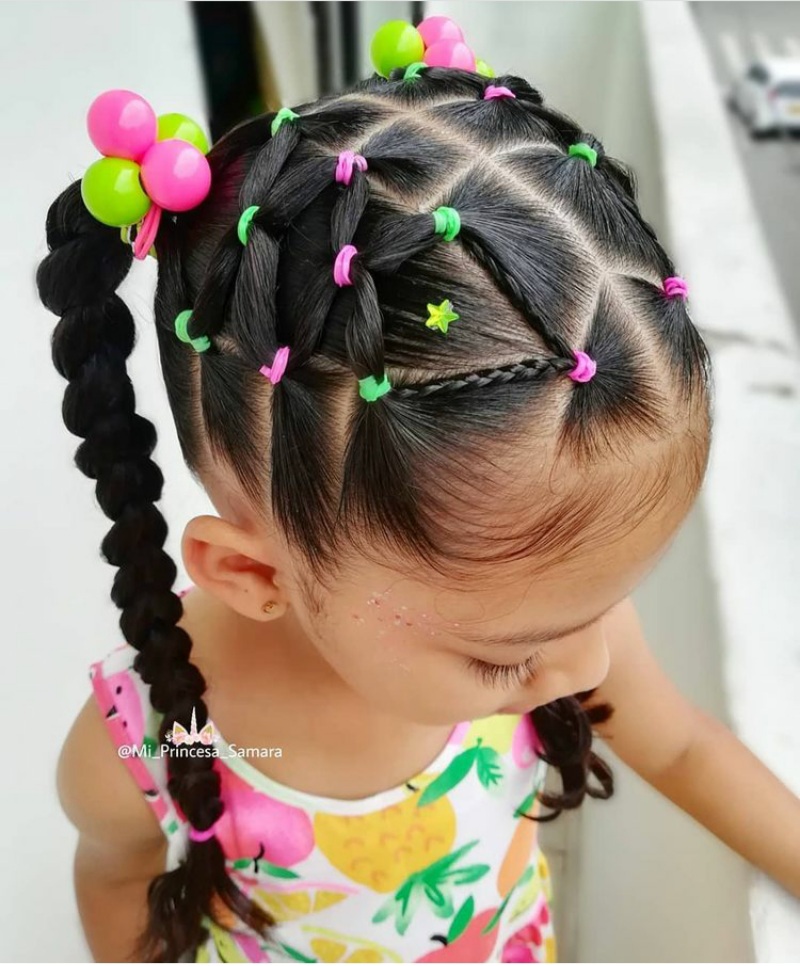
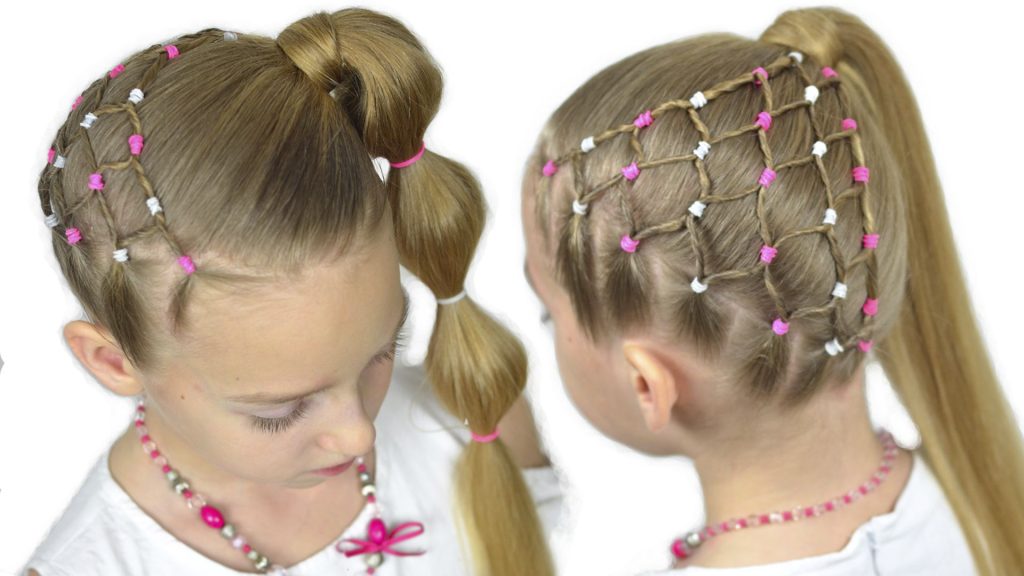
Vibrant Rainbow Rubber Band Styles
Rainbow rubber band hairstyles offer a fun and vibrant way to express your style. Using various colors of rubber bands, you can fashion patterns, shapes, and designs in your hair. Here are some popular rainbow rubber band hairstyles:
- Twin Buns with Rubber Bands: Divide your hair down the middle and incorporate rubber bands into three sections on each side. Twist each section into a bun and secure it with additional rubber bands. You can choose either white or colorful rubber bands for this playful style.
- Rubber Bands and Butterflies: Part your hair into two sections and add rubber bands to the top section. Create a bun with the top section and embellish it with butterfly clips. Leave the bottom section loose or braid it for added texture.
- Side Part Rubber Band Hairstyle: Create a side part in your hair and adorn the opposite side with rubber bands. Utilize contrasting rubber band colors to make a striking statement. Enhance the side with rubber bands by adding a bow or a flower for extra flair.
- Bubble Braid with Rubber Bands: Start with a high ponytail and incorporate rubber bands along its length. Pull out some hair between each rubber band to form bubbles. You can opt for rainbow-colored rubber bands or coordinate them with your outfit for a stylish look.
These rainbow rubber band hairstyles allow you to play with color and design, adding a playful and vibrant touch to your hair.

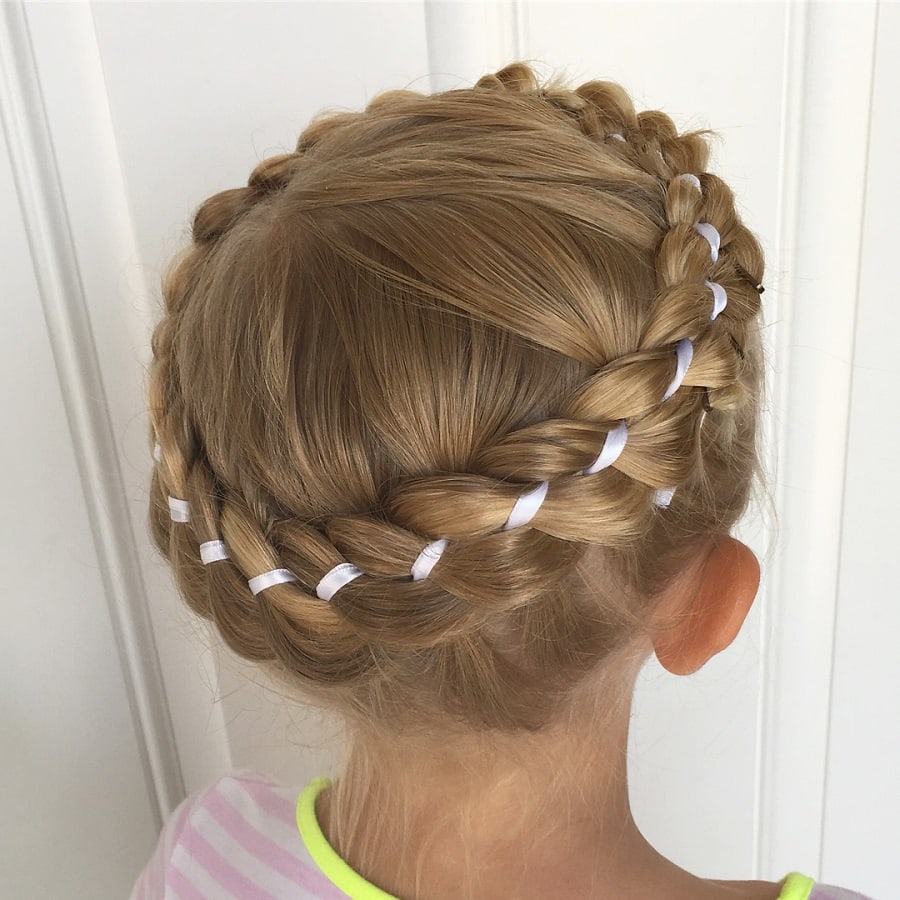
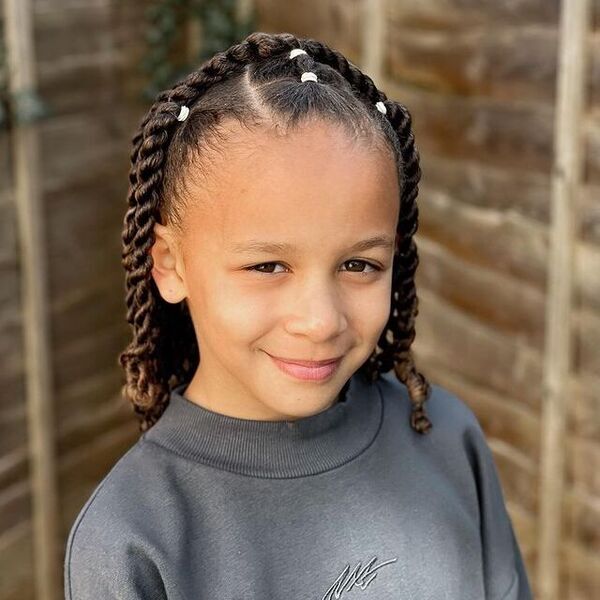
Single Braids Adorned with White Bands
Single braids with white bands are a versatile and stylish choice for any occasion. They’re low-maintenance and can last for weeks with proper care. Here’s how to achieve this look:
- Start by washing and conditioning your hair for a smooth texture.
- Divide your hair into small sections, securing them with clips or rubber bands.
- Take one section, split it into three strands, and braid from root to tip, adding more hair as you go.
- Secure the end of each braid with a white band, repeating for all sections.
- Style your braids as desired, whether it’s a loose look, a bun, a ponytail, or a half-updo.
These single braids offer a canvas for self-expression. You can add fun and festivity with beads, charms, or ribbons.
For a chic and elegant appearance, consider single braids with white bands. Draw inspiration from various braided hairstyles, making it suitable for any occasion and adaptable to your style preferences.
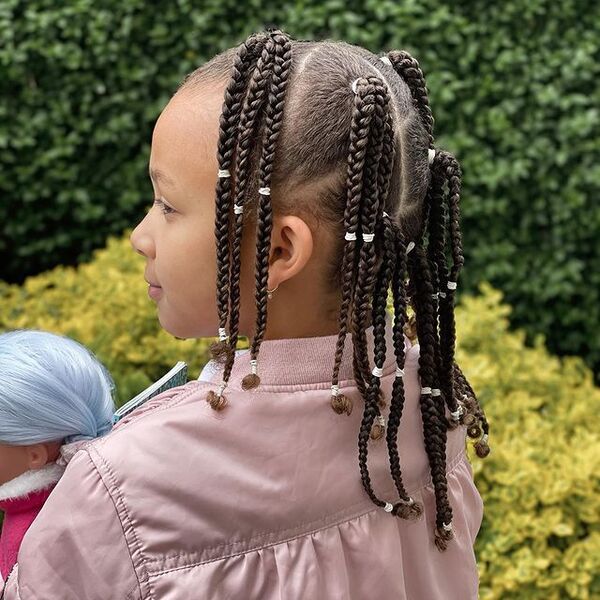
Long Hair featuring Delicate Braided Layers
Long hair with delicate braided layers is a charming and practical choice for young girls. This hairstyle involves dividing long hair into small sections, with each section woven into a slender braid. These braids are then layered on top of one another, secured with rubber bands, resulting in a stunning and distinctive look. It suits girls with long, straight hair and complements all hair textures. This low-maintenance style is well-suited for active young girls who engage in sports and outdoor activities.
To achieve this hairstyle, a hairstylist can partition the hair into small sections, creating individual braids and layering them atop one another. You can enhance this hairstyle with hairpins, ribbons, or flowers to infuse an extra touch of charm.

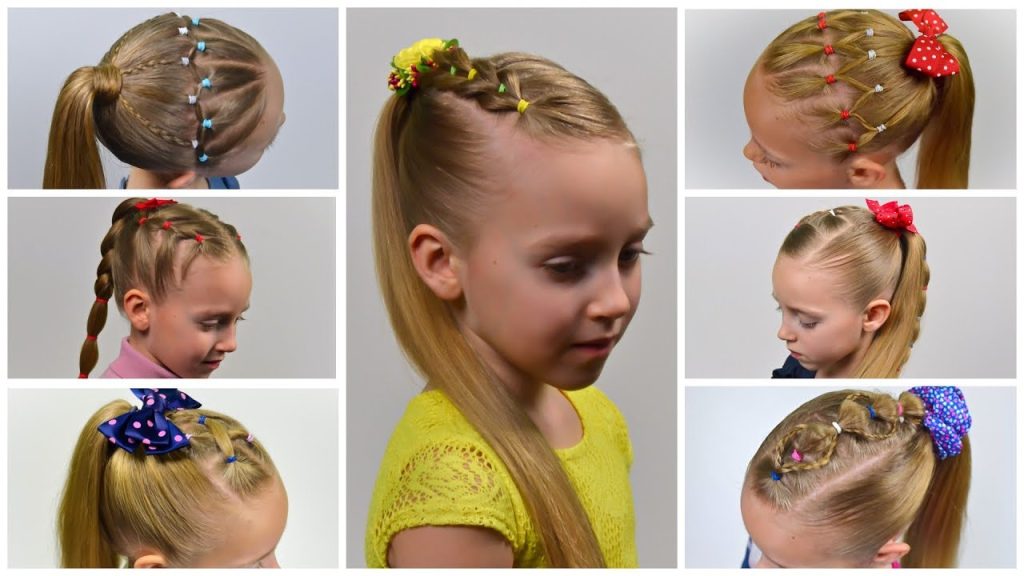
Five Graceful Lace Rubber Bands
For a quick and elegant hairstyle that’s perfect for medium to long hair and suitable for girls of all ages, consider the 5 Lace Rubber Bands hairstyle. This colorful and vibrant hairstyle features a captivating pattern created with multiple different colored bands and hair clips. It not only adds a touch of chic elegance but also keeps hair neatly away from the face throughout the day.
If you’re seeking a creative use for rubber bands, give the Lace Rubber Bands hairstyle a try. This style calls for just five small rubber bands and is an excellent way to elevate your everyday look. For even more hairstyle inspiration that keeps your hair in place and showcases your athletic prowess, explore some unique Volleyball Hairstyles for Women in 2023.
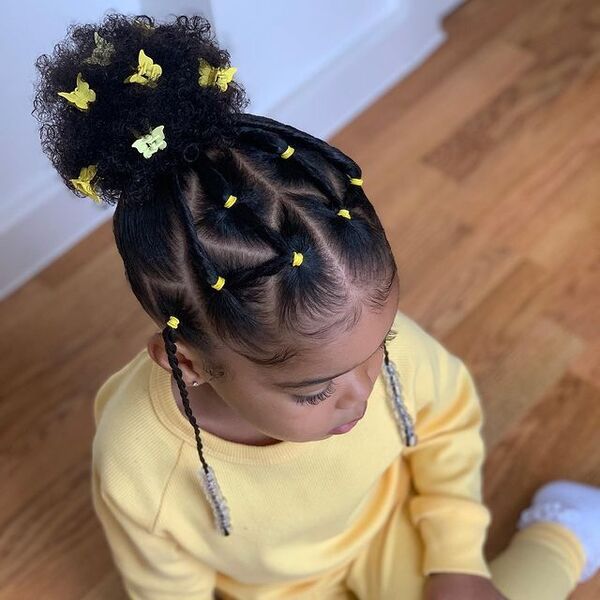
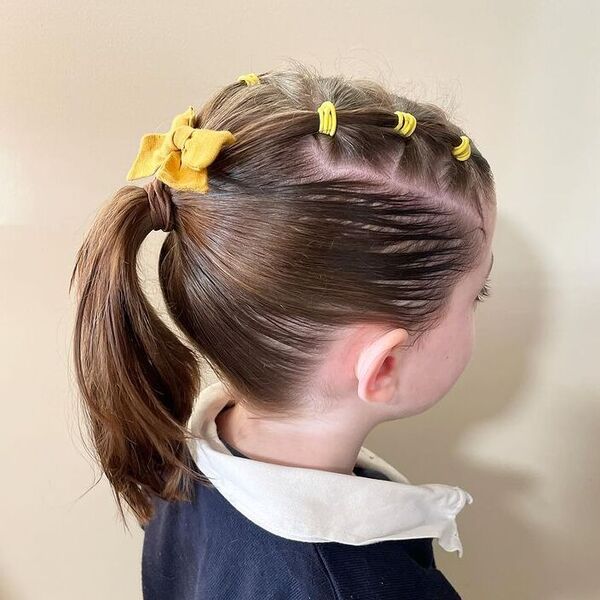
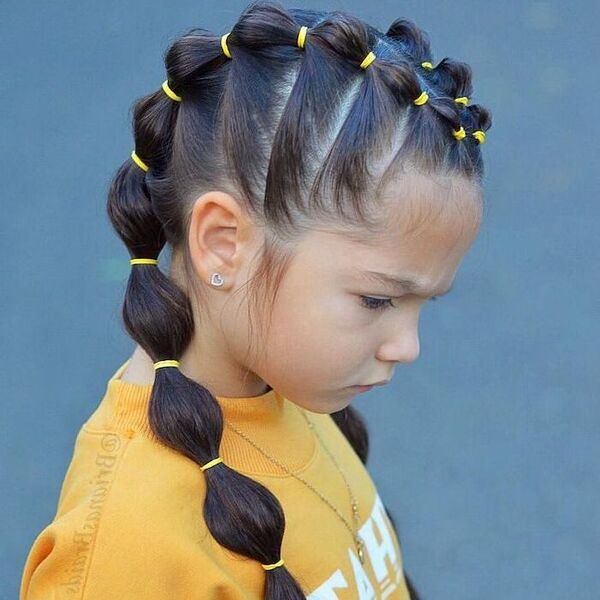
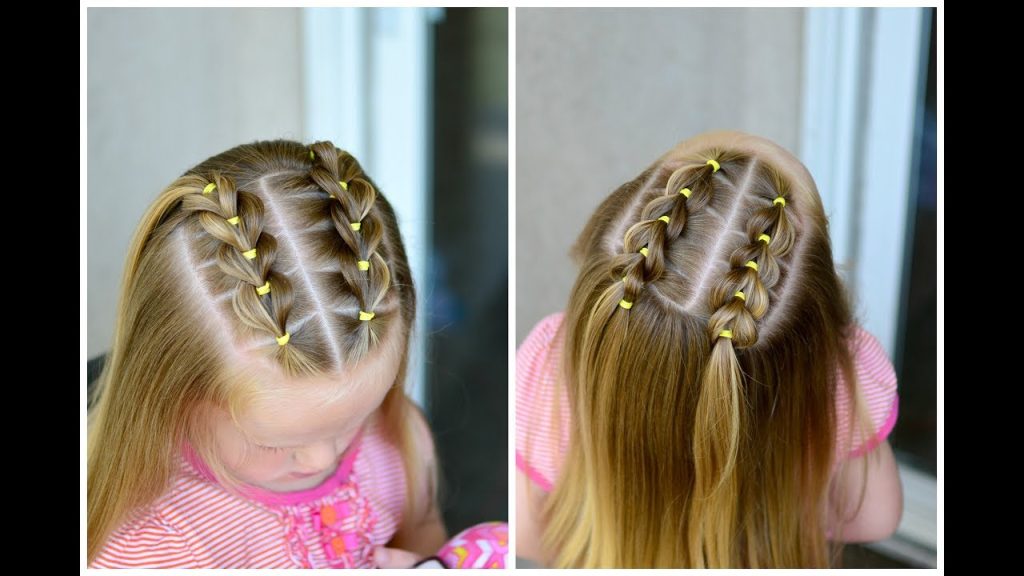
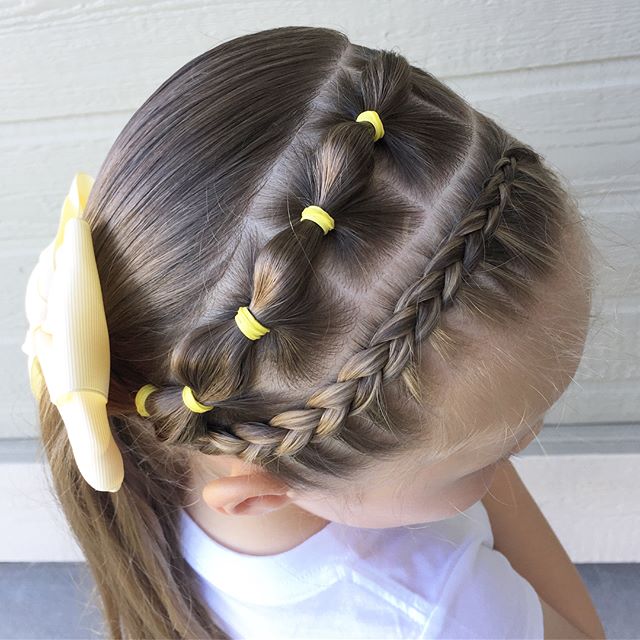
Zigzag Ponytail Enhanced by Yellow Bands
Here’s a simple yet fun and adorable way to style your girl’s hair – the zigzag ponytail with yellow bands. If you’re looking to infuse some texture and color into her hair, this hairstyle is perfect. It’s a quick and easy style to achieve.
This style features a zigzag pattern that elegantly sweeps her hair back, secured with cheerful yellow bands. The various sections converge into a stylish ponytail, adorned with a charming bow. It’s a fantastic choice and a beautiful hairstyle suitable for school or outdoor activities.
Neatly Tied Mini Ponytails
Tied mini ponytails are a beloved hairstyle among 9 and 10-year-old girls. This chic look entails sectioning the hair into numerous small portions and securing them with elastic bands to create mini ponytails. These ponytails can be arranged all over the head or in various patterns, offering versatility in styling. They work well with different parts, whether it’s a middle or side part, and can be adapted for various hair lengths.
This hairstyle is both easy to fashion and maintain, making it a preferred choice for busy parents and young girls who enjoy experimenting with their hair. It’s also ideal for school and sports activities, as it keeps hair neatly away from the face.
For a fresh twist on your tied mini ponytails, consider incorporating braided accents into your style. Drawing inspiration from cornrow braids, a popular African hairstyle, you can infuse a unique texture into your mini ponytails while still ensuring that your hair stays out of your face. Cornrow braids involve weaving small hair sections close to the scalp, forming a raised row that adds a playful and edgy touch to your mini ponytails.
Half Updo with Orange Rubber Bands
For a simple yet stylish hairdo, consider the half-up orange rubber band hairstyle. It’s a quick and easy way to add color and texture to your look. All you need are orange rubber bands and a comb. Here’s how to achieve it:
- Start by combing your hair to ensure it’s free of tangles.
- Take a small section of hair from the front of your head and secure it with an orange rubber band at the back.
- Repeat the previous step with another section of hair from the opposite side of your head. Cross it over the first section and secure it with another rubber band.
- Continue this process, creating a row of crisscrossed rubber bands along the back of your head.
- Leave the remaining hair loose or add curls for extra volume.
With these simple steps, you’ve completed the half-up orange rubber band hairstyle. It’s a versatile look suitable for any occasion, whether it’s for work, school, or a party. This hairstyle will help you stand out and showcase your unique personality.

Diagonal Pull-Through Braids Embracing Rubber Bands
Diagonal pull-through braids are a trendy choice for 9 and 10-year-old girls. This captivating style involves crafting multiple braids that intersect diagonally across the head, resulting in an intricate and attention-grabbing appearance. To achieve this look:
- Start by diagonally parting the hair across the head.
- Divide the hair into small sections and create basic three-strand braids for each section.
- Secure each braid with a clear elastic band.
- Once all the braids are done, select a small section of hair from the top of one braid and pull it through the top of the next braid.
- Repeat this process for each braid until all the braids are intricately interwoven.
This style is perfect for special occasions or to infuse some fun into an ordinary day, offering a captivating and unique appearance.
Four Elegant Lace Braids with Orange Bands
For an effortlessly stylish hairstyle, consider trying out 4 lace braids with orange bands. It’s a fantastic way to introduce color and texture to your hair without the need for heat or chemicals. Here’s how to achieve this look:
- Divide your hair into four equal sections and secure each one with an orange band near the roots.
- Begin loosely braiding one section, adding hair only from the front side as you progress. This creates a charming lace effect that frames your face.
- Secure the end of the braid with another orange band and repeat this process for the remaining sections.
- You can opt to leave the braids as they are or gently pull them apart to achieve a fuller and slightly messy appearance, giving you the perfect 4 lace braids with orange bands.
To elevate your lace braids, consider adding some colorful rubber bands. Explore long box braids hairstyles for inspiration, and then infuse your own unique twist by weaving in vibrant orange bands. This pop of color will infuse extra fun and playfulness into your braids.
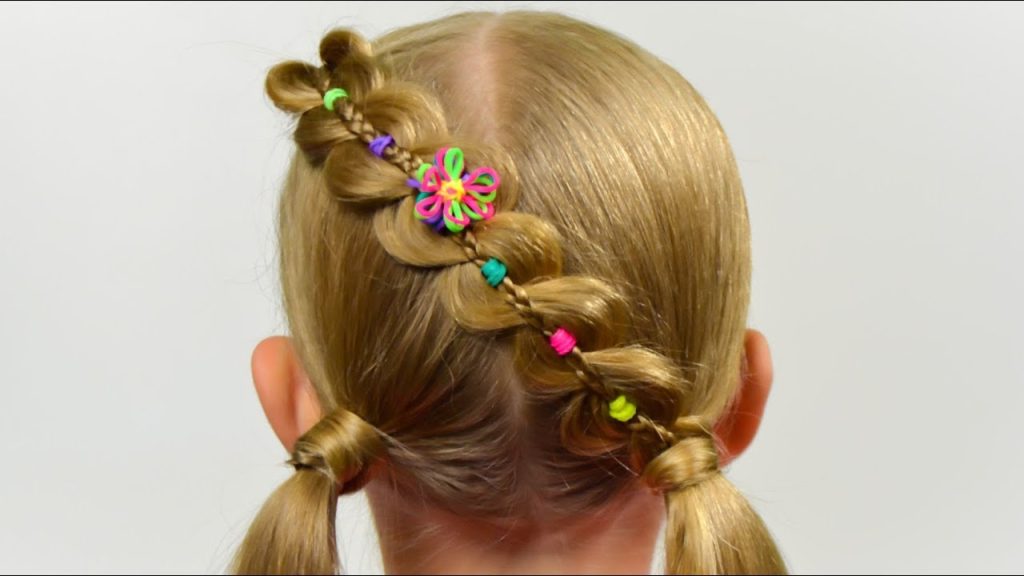
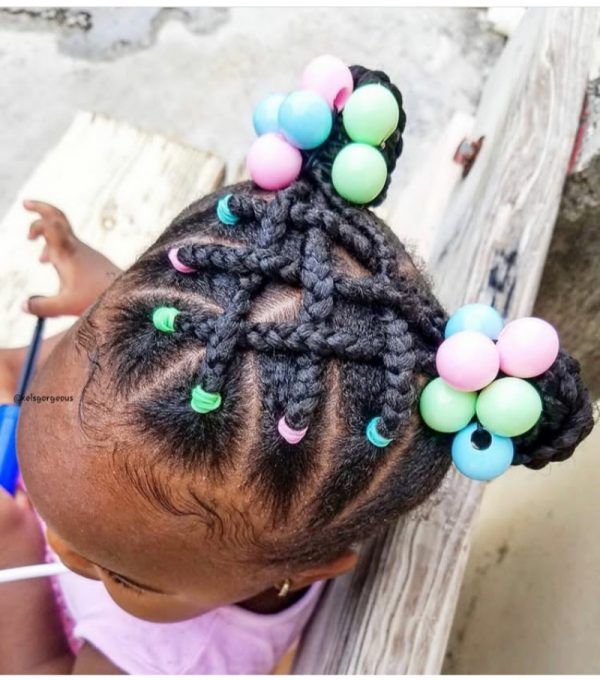
Intricate Four-Strand Braid Flower
The four-strand braid flower is a lovely hairstyle ideal for 9 and 10-year-old girls. This intricate style involves weaving four hair strands together in a specific pattern to create a flower-like shape. To achieve this look, start with clean, tangle-free hair. Here’s how to create it:
- Divide the hair into four sections.
- Cross the strands over each other following a specific sequence until the flower shape takes form.
- Once complete, secure the finished style with bobby pins or hair ties.
- Enhance the look by adding ribbons or other accessories for a touch of glamour.
This versatile hairstyle is suitable for special occasions or everyday wear and becomes easier to achieve with practice.
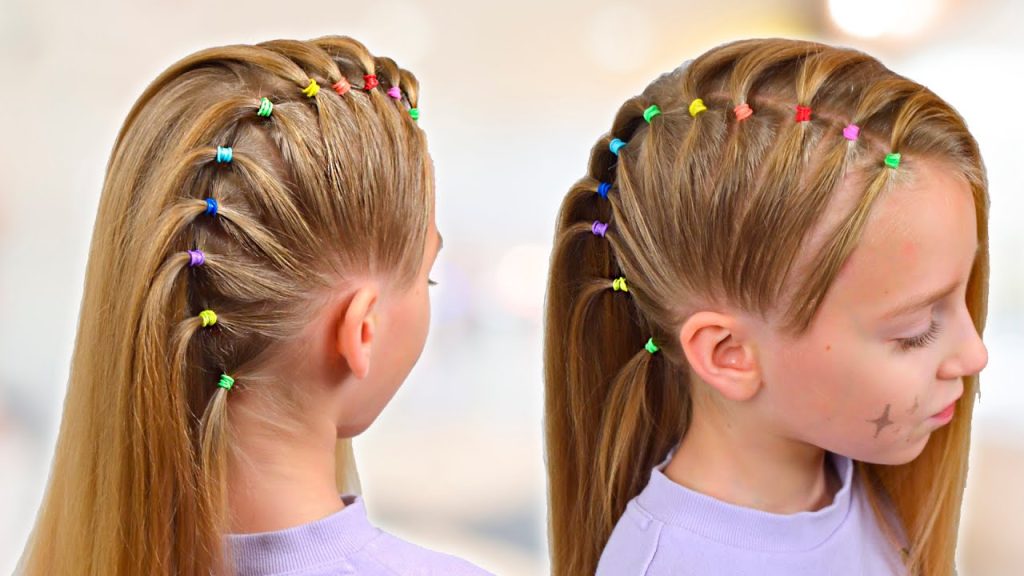
Elegant Hairstyles Accented by Blue Rubber Bands
If you’re seeking a trendy and hassle-free hairstyle that’s enjoyable to flaunt, consider the chic blue rubber band hairstyles. These styles incorporate small blue elastics to create diverse patterns and sections in your hair, adding a vibrant and playful touch. You can even coordinate your rubber bands with your outfit or accessories for a harmonious look. Take, for instance, this elegant blue rubber band hairstyle paired with blonde hair and a ponytail, perfect for teen girls, enhanced with extra blue rubber bands.
For an even more stylish twist to your blue rubber band hairstyle, explore combining it with protective hairstyles. This not only elevates the elegance of your hair but also provides added protection and care.
Mohawk Hairstyles for Toddlers with Rubber Bands
Rubber band mohawk hairstyles offer a playful and imaginative way to style your toddler’s hair. They’re simple to create and can be personalized with various colors and accessories. Here’s how to craft a rubber band mohawk hairstyle for your little one:
- Start by washing and gently detangling your toddler’s hair. Consider using a leave-in conditioner or curl cream to moisturize and define their curls.
- Divide the hair into three sections: one on each side of the head and one in the middle. Secure each section with a hair clip or a rubber band.
- Take a small section of hair from the front of the middle section and wrap a rubber band around it. Ensure the rubber band is snug but not too tight or too loose.
- Repeat the third step with the remaining hair in the middle section, creating a row of rubber bands along the center of the head.
- You have the option to leave the hair ends loose or twist them into small buns. Secure the buns with bobby pins or additional rubber bands.
- To add extra flair, consider embellishing the rubber bands with beads, bows, or other accessories.
Now, admire your toddler’s adorable and quirky rubber band mohawk hairstyle!
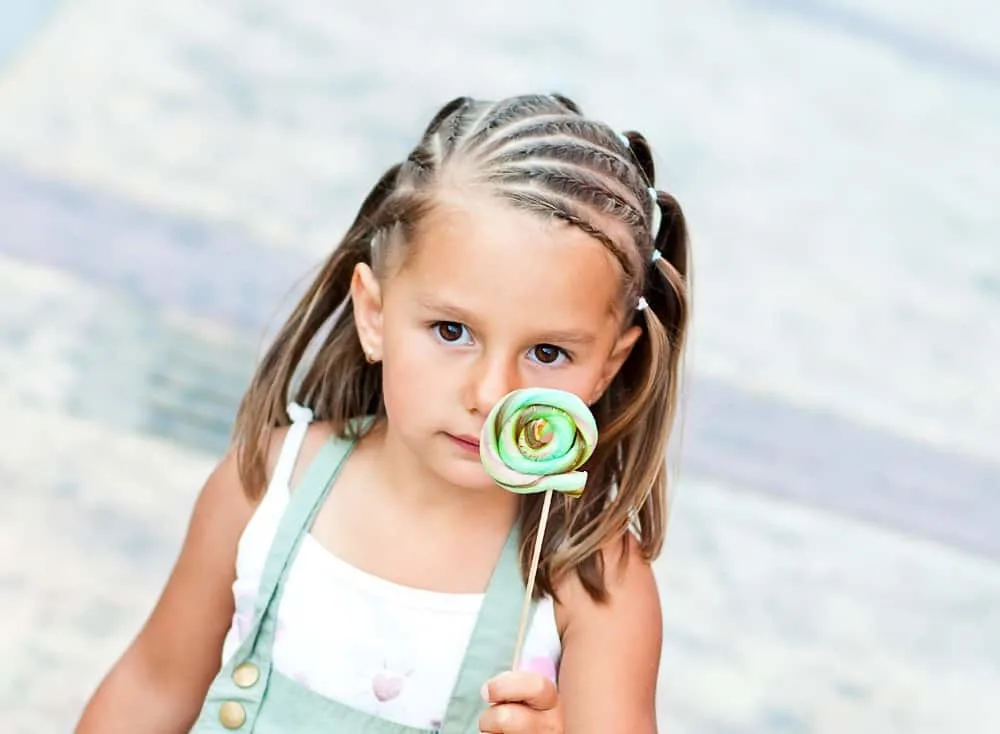
Sleek Asian Side-Parted Pigtail Braid with Rubber Bands
The Side-Parted Pigtail Braid is a charming and quick hairstyle that can be done in minutes. It’s ideal when you want to keep your hair away from your face while maintaining a stylish and feminine appearance. Here’s how to achieve it:
- Begin by parting your hair to the side. You can use a comb or your fingers to create a clean, well-defined parting.
- Take a section of hair from the front on the larger side of the parting and divide it into three strands. Initiate a French braid by braiding it towards the back of your head, incorporating more hair from both sides as you progress.
- Once you reach the nape of your neck, secure the braid with an elastic band. Repeat these steps on the opposite side of your head.
Remember, you don’t always have to opt for a center part when creating pigtail hairstyles. A side part adds a more mature touch to pigtail braids and can also help balance out a round or heart-shaped face.
For a sleek and chic appearance, consider complementing the side-parted pigtail braid with long hairstyles for Asian women that incorporate rubber bands. This trendy combination pairs well with elegant outfits and is suitable for various formal or casual occasions.
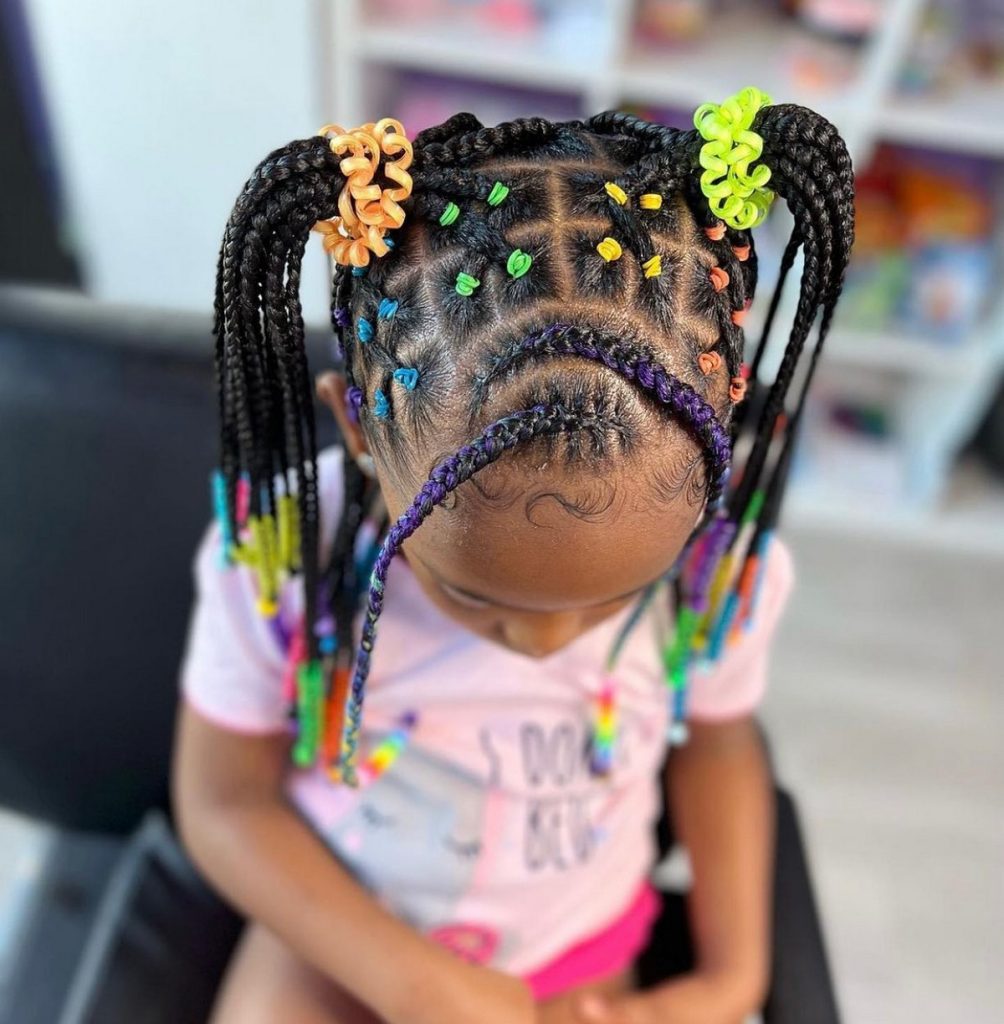
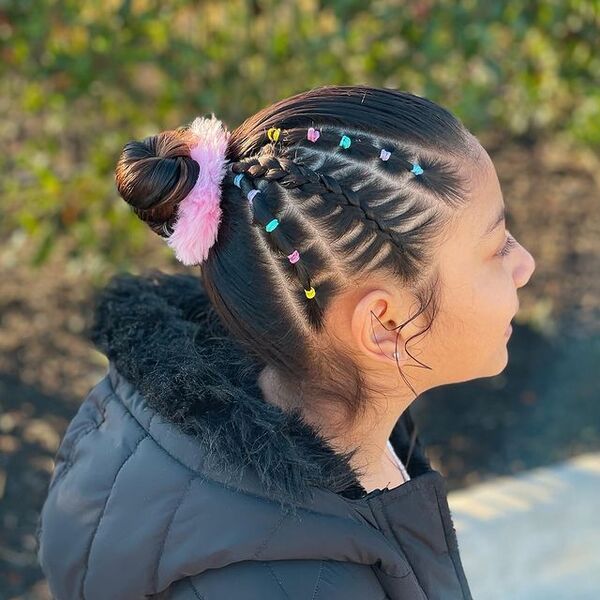
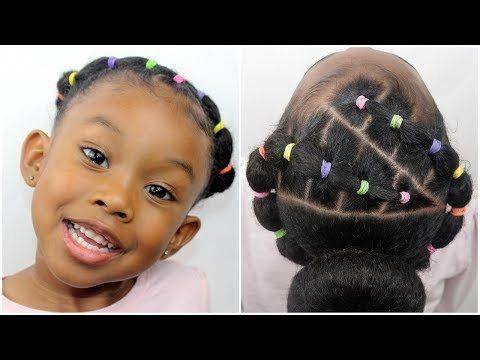
Stylish Mid-Part Criss-Cross Hairstyle with Rubber Bands
The mid-part criss-cross rubber bands hairstyle is a fashionable and straightforward way to style your natural hair. It entails parting your hair down the middle and forming small sections on each side, which you secure with vibrant rubber bands.
Next, you cross these sections over each other and fasten them at the back of your head. This results in a playful and edgy appearance suitable for any event. If desired, you can also incorporate clip-ins or extensions to enhance the length and volume of your hair.
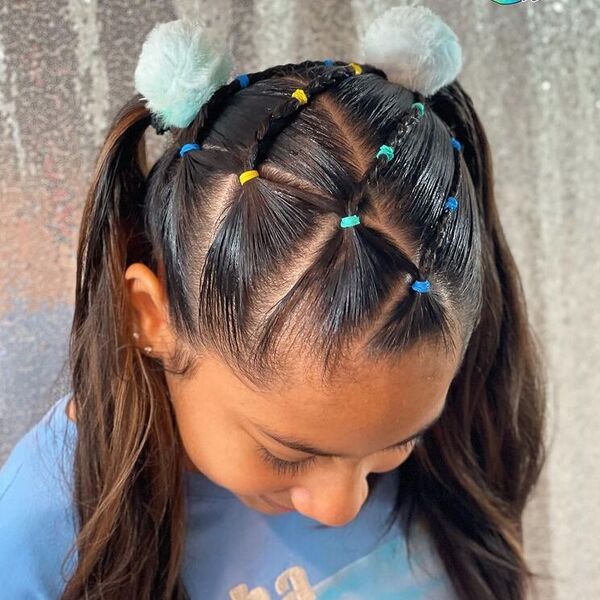
Asian-inspired High Pigtail with Rubber Bands
The high pigtail hairstyle involves dividing the hair into two sections, one on each side, and securing them on the top of the head. This hairstyle is commonly linked with a youthful, cute, and playful appearance. It can be adorned with various accessories like ribbons, bows, or clips.
High pigtails offer versatility as they can be braided, curled, or straightened to achieve diverse looks. Notable figures like Ariana Grande, Gwen Stefani, and Harley Quinn have sported high pigtails, showcasing its adaptability and fun appeal. Whether for casual or special occasions, high pigtails can suit different personalities and styles.
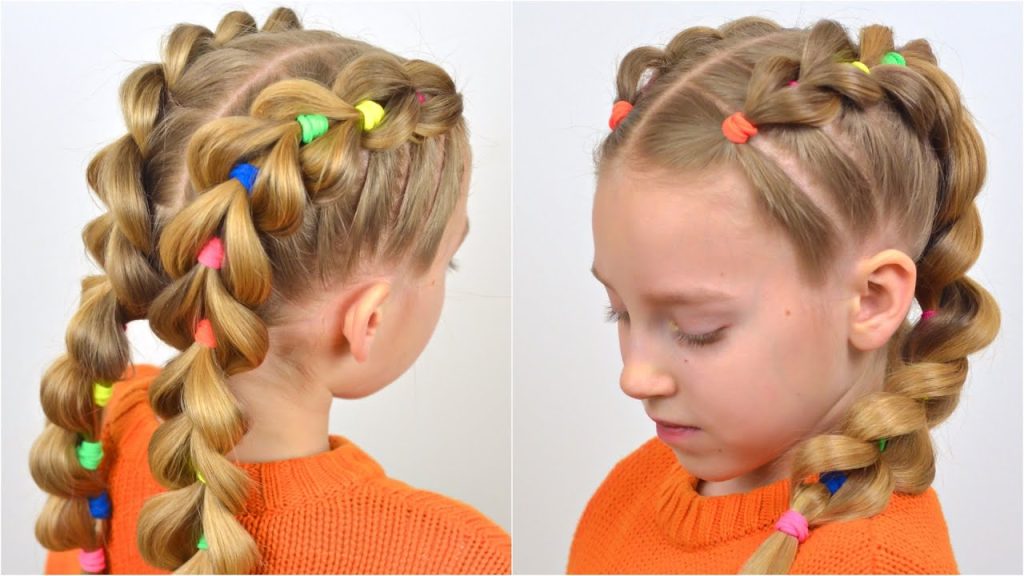
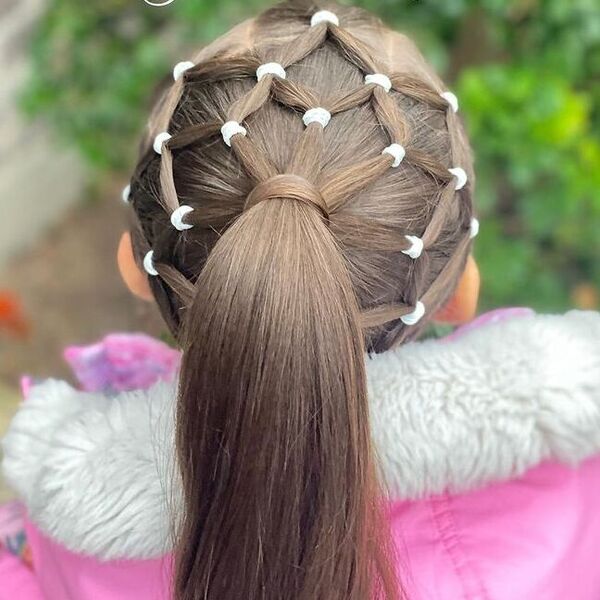
Diamond Pattern Rubber Band Dutch Braid
For a stunning hairstyle that combines rubber bands and braids, consider trying the diamond rubber band with Dutch braid style. This elegant and professional look is suitable for any occasion. Here’s how to achieve it:
- Begin by parting your hair into four sections: two on each side of your head and one in the middle.
- Take the middle section and divide it into smaller subsections. Use colorful rubber bands to secure each subsection at the roots, forming a diamond shape.
- Take one of the side sections and divide it into three strands. Start braiding a Dutch braid, which is like a reverse French braid, by crossing the strands under each other instead of over. As you braid, add more hair from the side section to each strand.
- When you reach the end of the side section, continue braiding normally until you reach the end of your hair. Secure with a rubber band.
- Repeat steps 3 and 4 on the other side section.
- You can leave the braids as they are, or for a more sophisticated look, twist them around each other and pin them at the back of your head.
- To add a touch of fun and festivity, consider accessorizing with bows, clips, or flowers.
With practice, you’ll master the diamond rubber band with Dutch braid hairstyle and appreciate how it enhances your appearance.
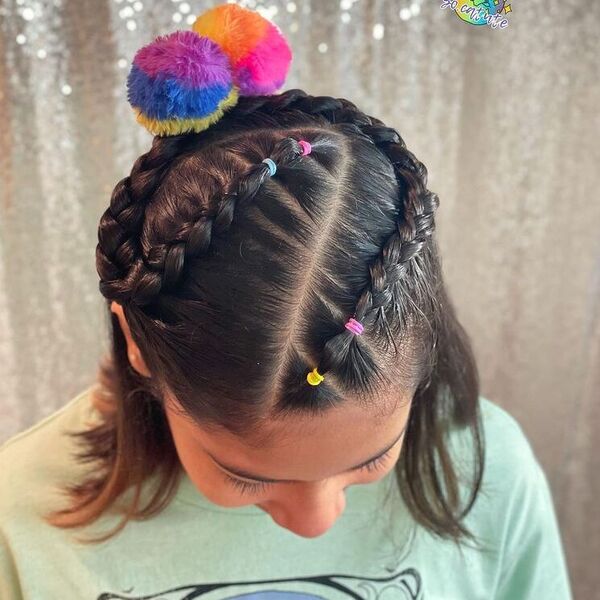
Vibrant Rainbow Braided Hair with Rubber Bands
Creating vibrant and playful hairstyles with rainbow-colored rubber bands is an enjoyable and lively way to adorn your hair. These hairstyles are not only simple to execute but also offer a range of possibilities based on the size and positioning of the rubber bands. You can experiment with various rubber band colors to complement your attire or reflect your mood, or even mix and match them for a dazzling rainbow effect. Here’s a step-by-step guide on how to craft these braided rainbow rubber band hairstyles:
- Begin with clean, well-detangled hair. Enhance manageability by applying a leave-in conditioner or hair oil to smoothen your locks.
- Divide your hair into sections according to your desired hairstyle. For instance, you can create two sections for classic pigtails, four sections for neat box braids, or multiple sections for an edgy mohawk style.
- Secure each hair section using a rubber band of your preference. Ensure the rubber bands are snug enough to hold your hair securely but not so tight that they cause strain or harm to your strands.
- Braid each section of hair, starting from the rubber band and working your way down to the tips. You have the flexibility to choose between a traditional three-strand braid, a stylish fishtail braid, a twisted rope braid, or any other braid style that appeals to you.
- Seal the ends of each braid with another rubber band. You can opt for the same color as the initial one or introduce a contrasting hue for added visual appeal.
- Continue repeating steps 3 to 5 for all the sections of your hair until you have completed your stunning braided rainbow rubber band hairstyles. Enjoy your colorful and creative look!
Knotless Braids Featuring Blue Bands
Enhance your knotless braids with a touch of blue bands, adding vibrancy and flair to this popular protective style. Knotless braids offer a natural and sleek appearance, achieved by integrating braiding hair seamlessly with your own, rather than knotting it at the roots. This method reduces bulkiness and increases comfort compared to traditional box braids. Here’s a concise guide to achieving this unique style:
- Start with clean, well-moisturized hair. Divide your hair into four sections and secure them with clips.
- Take a small segment from one section and apply edge control or gel to ensure a sleek surface.
- Use a rat-tail comb to divide this section into three strands, then initiate the braiding of your natural hair for about an inch.
- Take a small piece of braiding hair, fold it in half, and insert it into the middle strand of your natural hair. Continue the braiding process.
- Continue to incorporate more braiding hair into the middle strand while braiding, ensuring even and smooth distribution.
- Braid until you reach the end of your hair and secure it either with a small rubber band or by sealing the tip with a lighter.
- Repeat steps 2-6 for the remaining three sections of your hair, completing the entire style.
- To add an element of uniqueness, place blue rubber bands around your braids wherever you prefer, introducing a playful burst of color.
Elevate your knotless braids with these blue bands, infusing character and excitement into this timeless look. For further knotless braid inspiration, explore tribal braids for a bold and striking appearance.
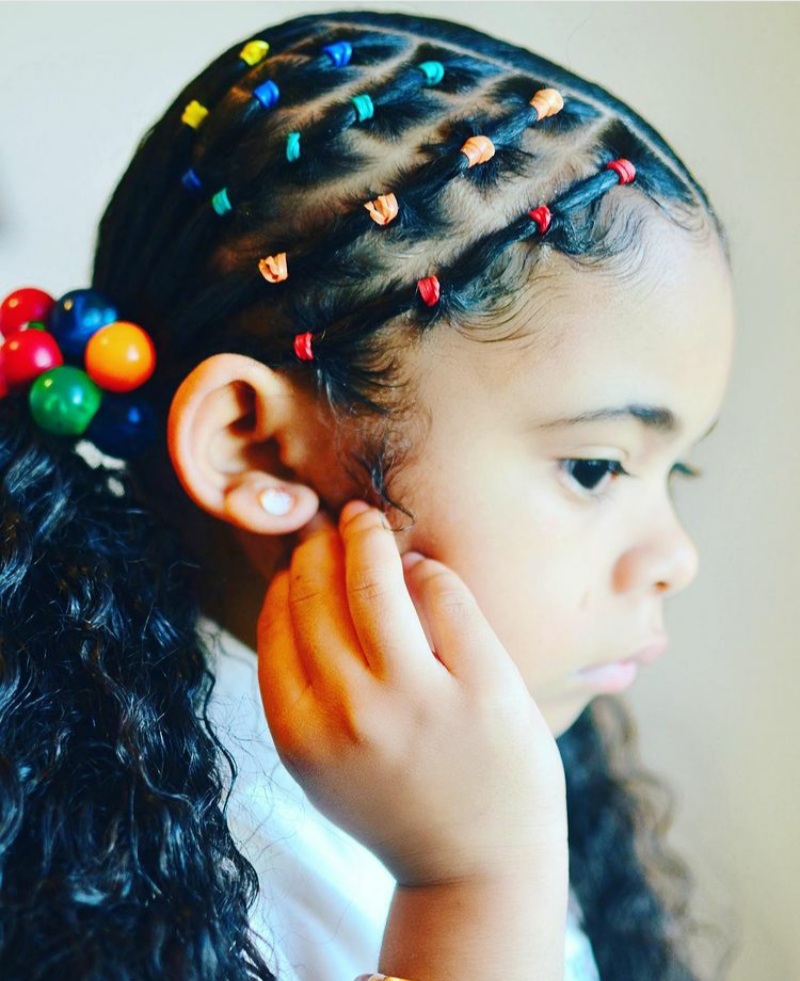
Colorful Side-Parted Rubber Band Hairstyles
Rainbow side part rubber band hairstyles offer a playful and vibrant way to embellish your hair. Whether you want to infuse some excitement into your everyday appearance or prepare for a special occasion, this hairstyle delivers. Here’s how to craft this colorful look:
- Begin by creating a side part in your hair, and then divide it into smaller sections along the parted line.
- Secure each of these sections with rubber bands of various colors, forming a captivating rainbow pattern.
- Mirror this process on the opposite side of the part, ensuring that you use the same colors in the same sequence.
- The remainder of your hair can be left flowing freely or styled to your preference.
Enjoy your fun and lively rainbow side part rubber band hairstyle!
Explore other hairstyles here!
Spooky Vibes with Bubble Braids and Bands
If you’re seeking a fun and imaginative Halloween hairstyle, why not explore the spooky world of bubble braids and bands? Bubble braids are a distinctive braided hairstyle that creates a voluminous effect by incorporating elastic bands along the length of the braid. You can customize the size of the bubbles to your liking by adjusting the number of bands used. To infuse a touch of spookiness into your bubble braids, consider using black or dark-colored bands, or get creative by adding faux spiders or bats amidst the bubbles.
To complete your Halloween look, accessorize your bubble braids with Halloween-themed clips, pins, or headbands. For instance, you can top it off with a witch hat, don a skeleton headband, or secure a spider web clip. This bubble braids and bands hairstyle is both straightforward and versatile, effortlessly complementing any costume or outfit. You can wear it as a single braid, twin braids, or even multiple braids for a hair-raising Halloween ensemble.
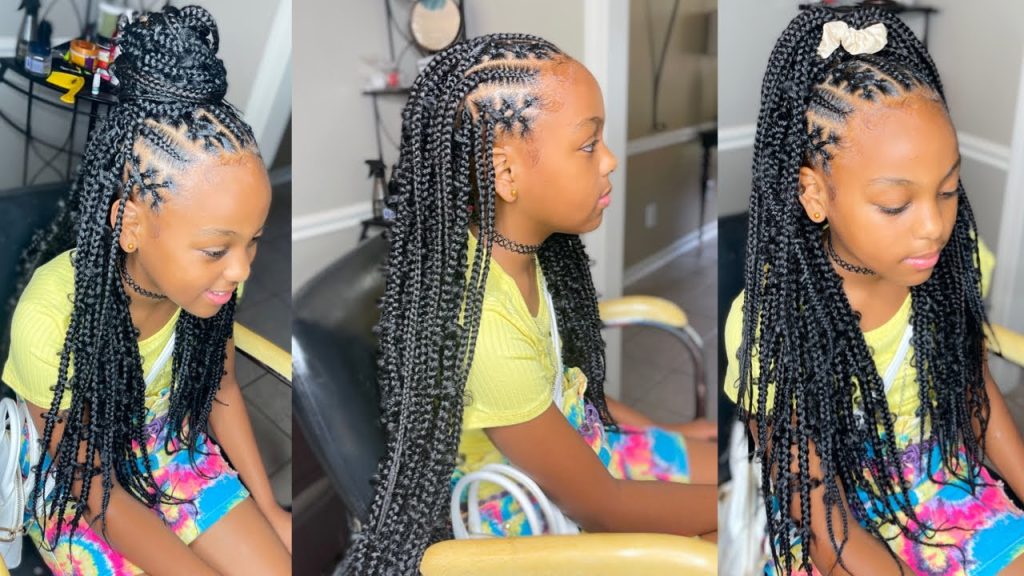
Chic Criss-Cross Knotless Braids with Black Rubber Bands
Criss cross knotless braids offer a chic and adaptable hairstyle that offers multiple styling possibilities. These braids are crafted by sectioning the hair and then interweaving them to create an appealing criss-cross pattern.
Unlike traditional box braids that involve extensions knotted at the hair’s roots, knotless braids progressively integrate the extensions while plaiting, resulting in a smoother and more natural appearance. This technique minimizes tension and potential damage. Criss cross knotless braids suit all hair types and lengths, providing the flexibility to be styled in various ways, including half-up, half-down, ponytails, buns, or adorned with beads, clips, or scarves.
For an edgy twist on this protective style, consider enhancing your criss cross knotless braids with black rubber bands. You can also opt for medium-sized braids, similar to medium box braids, for a stylish yet low-maintenance look.
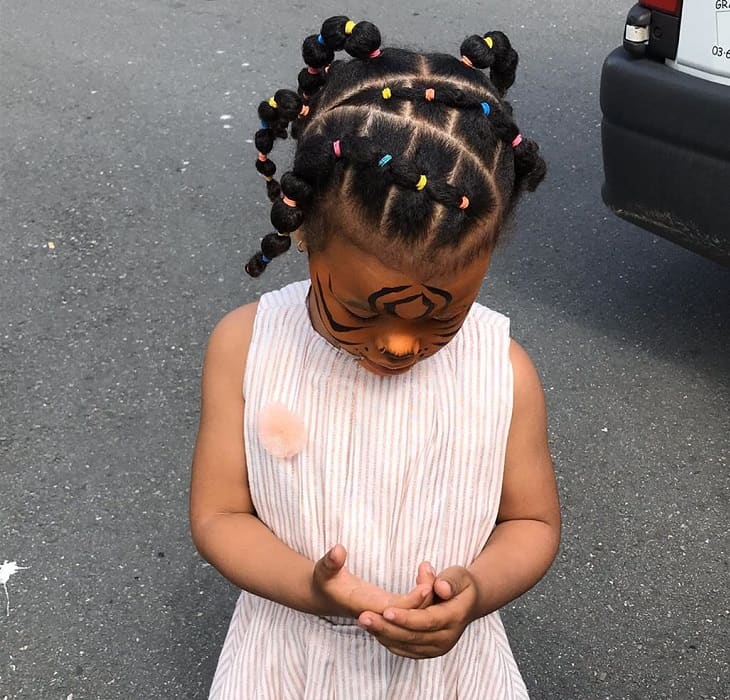
Adorable Pigtails Hairstyle with Rubber Bands
If you’re looking for an adorable and effortless hairstyle to try, consider the rubber band pigtails hairstyle. This charming look consists of partitioning your hair into small sections and fastening each one with vibrant rubber bands. Subsequently, you gather these sections into two pigtails positioned on either side of your head. You can choose to leave the pigtails flowing freely or twist them into buns to infuse a playful touch. The rubber band pigtails hairstyle is an excellent choice for festivals, parties, or relaxed days when you want to add a dash of excitement to your hair.
Pull-Through Styling with Rubber Bands and Bows
Create a trendy pull-through rubber band hairstyle with bows by following these simple steps:
- Begin by parting your hair to one side and dividing it into two sections: one in front of your ear and one behind it. Secure small hair sections with rubber bands near your scalp, alternating between front and back sections.
- After this, you’ll have four sections of hair with rubber bands, two on each side of your head.
- Take the first section on one side, split it into two, and pull the second section from the same side through the split. Secure it with another rubber band beneath the previous one.
- Repeat the previous step on the other side, alternating between front and back sections. Continue until you reach the end of your hair or run out of rubber bands.
- To finish, leave your hair loose or style it into a ponytail or bun. Add charming bows to the rubber bands for a cute and colorful touch.
Now you’ve created a pull-through rubber band hairstyle with bows! This chic and adorable style pairs well with various little black girl hairstyles for school, offering a whimsical touch with bows and dimension with the rubber bands. It’s suitable for both formal and casual occasions.

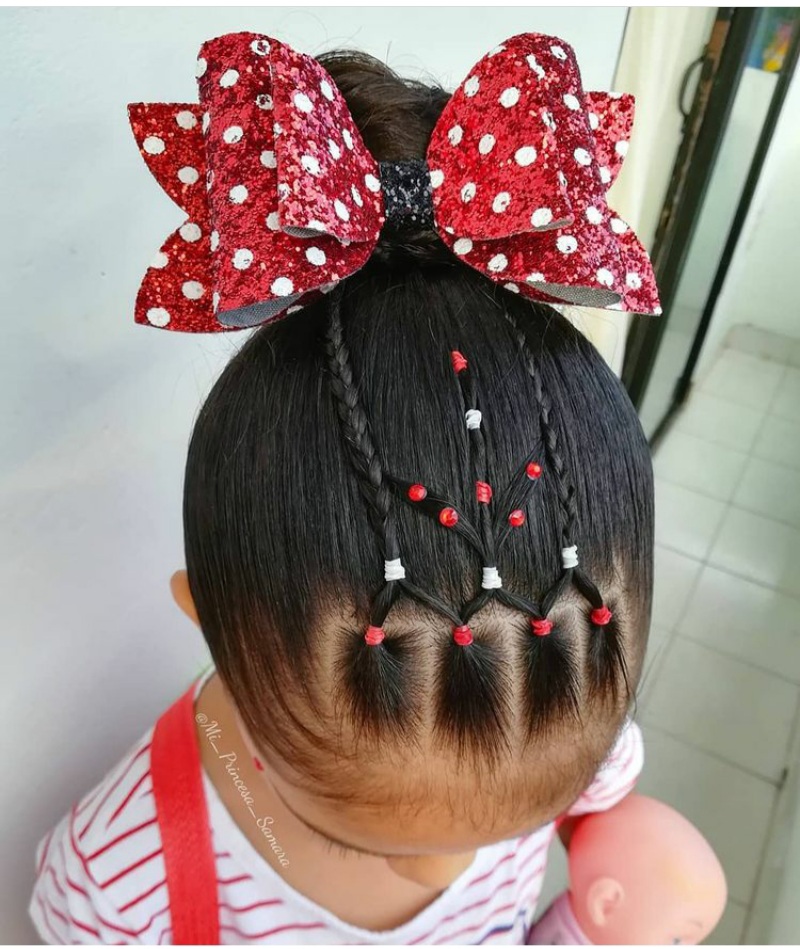
Heart-Shaped Bubble Braid Adorned with Rubber Bands
Achieving a charming heart bubble braid with rubber bands is a breeze with these simple steps:
- Begin by brushing your hair and parting it down the center. Take a small section of hair from the front on one side and secure it near the roots with a rubber band.
- Repeat the process on the other side. Now, take these two sections and cross them over each other at the back of your head, forming a heart shape.
- Fasten the crossed sections together with another rubber band. Proceed to take another small section of hair just below the first one on each side and secure them with rubber bands.
- Once again, cross these sections over each other and secure them with another rubber band, positioning it beneath the first heart. Continue repeating these steps until you reach the end of your hair or exhaust your supply of rubber bands.
- To complete the look, gently fluff up the sections to create bubbles and adjust the shape of the hearts as necessary. Congratulations, you’ve successfully crafted a heart bubble braid using rubber bands!
Crochet-Inspired Rubber Band Hairstyle
Creating a crochet rubber band hairstyle is a quick and simple method for achieving a crochet weave without traditional braiding. Here’s how to achieve this stylish look:
- Start by washing and conditioning your hair, followed by either blow-drying or air-drying it.
- Divide your hair into small sections and secure each section using a rubber band. You have the flexibility to choose the section size depending on your desired weave fullness.
- Select your preferred crochet twist, loc, or braid and insert the crochet hook through the rubber band loop.
- Hook the hair onto the crochet hook and pull it through the loop.
- Knot the hair around the loop and secure it with your fingers.
- Repeat steps 3 to 5 for each section until your entire head is covered with crochet hair.
- Trim or style the crochet hair to your liking. Congratulations, you’ve created a stunning crochet rubber band hairstyle that can last for weeks!
For a hassle-free and low-maintenance twist, consider incorporating curly crochet braids into your look. These braids introduce texture and volume to your hair, while the addition of rubber bands can infuse a playful and colorful element into your style.
Stylish Rubber Band Hairstyle for Straight Hair
Crafting a stylish and versatile rubber band hairstyle for straight hair is a straightforward process. Follow these steps to create a basic look:
- Begin with clean, dry hair, ensuring it’s free from tangles by brushing it smoothly.
- Divide your hair into two equal sections and secure one section using a clip or hair tie.
- Take a small front section from the unsecured part and gently wrap a rubber band around it near the roots, ensuring it’s neither too tight nor too loose.
- Repeat the rubber band placement with another small section next to the first one, forming a row of rubber bands along the front of your head.
- Now, take the two sections with rubber bands and cross them over each other to create an X shape. Secure them together at the point where they intersect using another rubber band.
- Continue repeating steps 4 and 5 until you reach the end of the unsecured section, forming a zigzag pattern of rubber bands along your head.
- Repeat steps 3 to 6 with the remaining section of hair, ensuring that the rubber bands align with those on the opposite side.
- You have the option to leave the hair ends loose or tie them into a ponytail or bun for added flair. Additionally, feel free to enhance your rubber band hairstyle with accessories like clips, bows, or beads.
Enjoy your stylish rubber band hairstyle with straight hair!
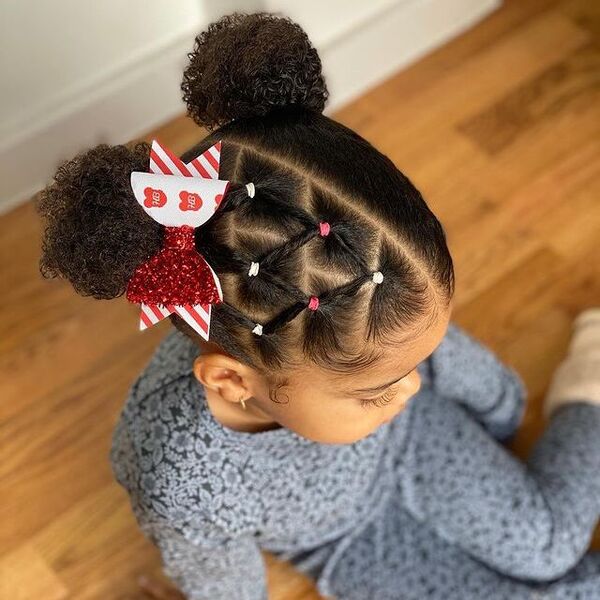
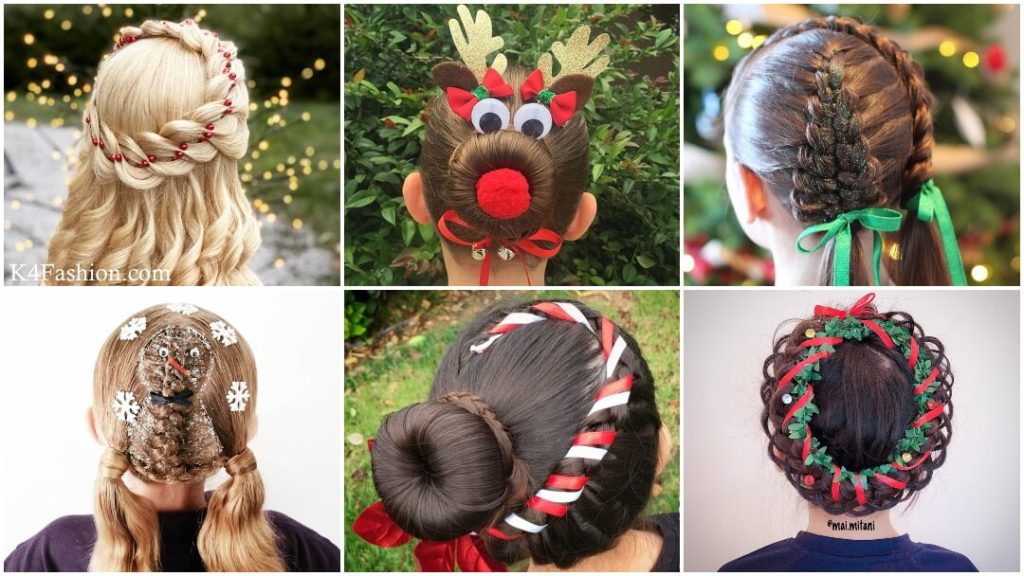
Festive Christmas-Inspired Rubber Bands with Green Bows
For a festive and enjoyable way to adorn your hair during the holiday season, consider trying out Christmas rubber bands featuring delightful green bows. These elastic bands are available in vibrant red and green hues, adorned with charming green bows. With these, you can craft a variety of hairstyles, including ponytails, braids, buns, or twists. Suitable for individuals of all ages, these accessories can infuse a touch of merriment and radiance into your overall look.
Christmas rubber bands with green bows offer a straightforward yet imaginative means of embracing the season’s spirit. They can effortlessly lend a festive and fashionable allure to your hair, allowing your personality to shine through. Whether you’re wearing them for a party, a school event, or simply for fun, they are guaranteed to bring a smile to your face and spread some holiday joy.
Side-Swept Rubber Bands and Double Buns
This stylish hairdo is ideal for those seeking a touch of fun and flair in their appearance. It’s a simple style suitable for any occasion. Follow these steps to achieve this look:
- Begin by brushing your hair and parting it to one side.
- Take a small front section of hair from the larger side, dividing it into two equal parts.
- Twist these two parts around each other and secure them with a small rubber band at the end.
- Repeat steps 2 and 3 with another section of hair from the same side, just below the first one.
- Gather the remaining hair from both sides and divide it into two equal sections.
- Twist each of these sections into a bun and secure them using a large rubber band or a hair tie.
- To personalize the style, you can choose to leave a few strands loose for a messy appearance or tuck them in for a neater look.
Enjoy your effortlessly chic and fun hairstyle!
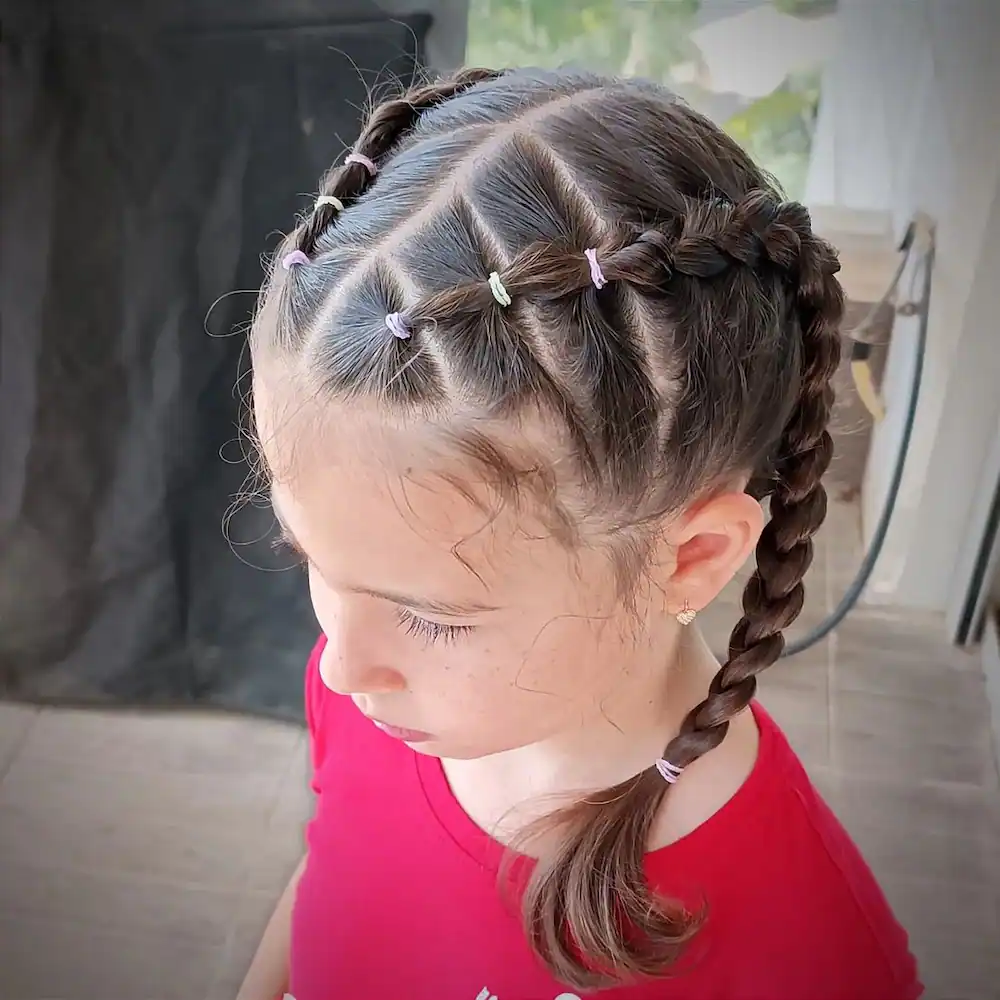
Dutch Braids with a Twist of Rubber Bands
For a fun and hassle-free hairstyle that keeps your hair off your face, try the Dutch and twisted rubber band braids. This style entails crafting two Dutch braids on each side of your head and then intertwining small hair sections with rubber bands along the braids. Here’s how to achieve this look:
- Begin by parting your hair down the middle, dividing it into two sections.
- Take one section and split it into three smaller sections near your forehead. Initiate a Dutch braid by crossing the outer sections under the middle one, incorporating more hair from the sides into each outer section as you braid.
- Continue braiding until you reach the nape of your neck, then secure the braid with a rubber band. Repeat the same process on the other side of your head.
- Next, divide one braid into four or five smaller sections. Twist each section around a rubber band, forming small loops along the braid. Repeat this step for the other braid.
- You have the option to leave some hair loose at the ends of the braids or tuck them under the loops for a neater appearance.
You’ve now successfully crafted Dutch and twisted rubber band braids! This versatile hairstyle suits school, work, or casual occasions, and you can add a playful touch with clips or bows.
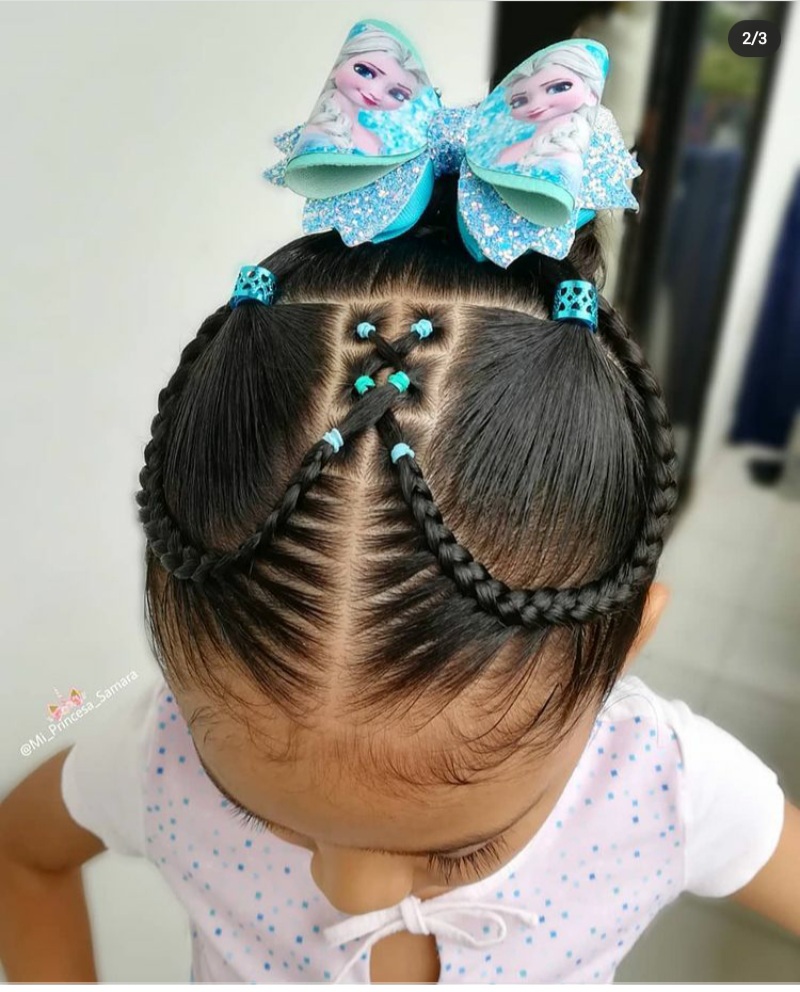
Half-Up Hairdo with Rainbow-Colored Bows and Rubber Bands
For an effortless and playful hairstyle for your little girl, consider the half up rubber band with rainbow bows. This versatile style is suitable for any occasion, be it a birthday party, a school day, or a playdate. Here’s how to create it:
- Begin by gently brushing your girl’s hair to ensure it’s free of tangles.
- Take a small front section of hair and secure it at the back of her head using a rubber band. Repeat this step on the other side.
- Now, select another small section of hair from just below the first one and connect it with the first section using another rubber band. Repeat this on the other side.
- Continue this process until you have four or five sections on each side, adjusting the number based on the length and thickness of her hair.
- Lastly, adorn each rubber band with a rainbow bow. To add extra fun and vibrancy, feel free to use various colors or patterns.
- You’re all set! Enjoy your girl’s adorable and cheerful hairstyle!

Playful Pigtail Hairstyle with Rubber Band Accents
If you’re in search of a delightful and practical accessory for your little girl, consider the pigtail rubber band with bows. Crafted from high-quality elastic material, this product securely and comfortably holds your child’s hair in place. It includes two charming bows that add a touch of style and color to your daughter’s hairstyle. The pigtail rubber band with bows is versatile, suitable for various occasions like school, parties, or casual outings.
This accessory is user-friendly, easy to apply and remove, and gentle on your child’s hair, preventing damage or tangling. It’s available in an array of colors and designs, allowing you to select the one that best matches your child’s personality and outfit. Order yours today to delight your little girl with a stylish and happy addition to her accessories.
Elevate your little one’s hair with bows and explore this cute hairstyle for little girls using rubber bands. These pigtails with bows can be the perfect choice for school or any special occasion, enhancing her adorable appearance.
Side-Swept Bubble Braids with Rubber Bands
For a quick and enjoyable hairstyle that adds texture and volume to your hair, consider trying side bubble rubber band braids. This style works well on hair of any length and type and can be achieved in just minutes. Here’s how to create this look:
- Begin by parting your hair to one side and dividing it into two sections.
- Take a small front section from the larger side and secure it with a rubber band near the roots.
- Gently tug on the hair above the rubber band to create a bubble-like effect.
- Repeat steps 2 and 3 until you reach the end of the section, then secure it with another rubber band.
- Repeat the same process on the other side of your head, ensuring that the number and size of the bubbles match.
- You have the option to leave your braids as they are or twist them together and pin them at the back of your head for a more elegant appearance.
And there you have it! You’ve successfully crafted side bubble rubber band braids, adding a unique touch to your look that will make you stand out from the crowd. Enjoy your new hairstyle!

Chic Rubber Band Accents for Short, Curly Hair
Rubber bands offer numerous styling options for curly short hair. Among the most popular choices is the criss-cross pattern. Here’s how to achieve it:
- Section the front of your curly short hair into small triangles or diamonds.
- Secure each section with a rubber band.
- Create a criss-cross effect by diagonally connecting the sections with another rubber band.
- You can leave the remaining hair loose or gather it into a ponytail or bun.
This hairstyle not only adds a touch of fun and color to your curly short hair but is also simple to do at home.
To infuse some vibrant color into your look, experiment with colorful rubber bands on your curly short hair. For inspiration, check out the “35 Trendy Hawaiian Hairstyles For This Summer 2023.” These hairstyles celebrate natural texture, offering options from loose waves to bouncy curls, all perfect for warm weather. Utilize rubber bands to achieve a chic half-up, half-down style or a playful space bun look. The styling possibilities are limitless!
Rope Twist Braids Enhanced by Rubber Bands
Create stylish rope twist braids using rubber bands with these simple steps:
- Section your hair into small or medium-sized parts, depending on your desired twist thickness.
- Apply gel or cream to each section and smooth it using a comb or brush.
- Secure each section with a rubber band near the roots, leaving a bit of space between the band and your scalp.
- Take a piece of synthetic braiding hair and fold it in half. Position it over the rubber band and wrap it around your natural hair.
- Divide your natural hair and the synthetic hair into two equal strands, then twist them together in the same direction.
- While twisting, wrap one strand over the other, creating a rope-like effect.
- Continue twisting until you reach the ends of the hair, then tie a knot or seal them by using a lighter.
- Repeat these steps for all the sections until you’ve achieved a full head of rope twist braids.
Rope twist braids with rubber bands are both easy to create and neat in appearance. With proper care, they can last for several weeks. You can style them in various ways, including updos, ponytails, buns, or half-up half-down styles. These braids are also an excellent choice for adding color and length to your hair without causing damage.
Bun Hairstyle with a Stylish Rubber Headband
Enhance your style effortlessly with a rubber headband featuring a bun. This hair accessory comprises a flexible rubber band that encircles your hair and a synthetic hair bun that attaches to the band. You have the option to select from a variety of bun colors and styles, allowing you to either match your natural hair or create an eye-catching contrast. The rubber headband with a bun is user-friendly and comfortable, suitable for casual, formal occasions, or even to add flair to your everyday look.
For a timeless and sophisticated appearance, elevate your rubber band hairstyles by incorporating a bun. To infuse a touch of sophistication, consider experimenting with a man bun. This versatile style is suitable for both informal and formal events, adding a dash of elegance to your overall look.
Square Braids Accentuated with Rubber Bands and a Bun
Achieve a stylish and elegant hairstyle with ease by trying out square rubber band braids with a bun. This hairstyle suits medium to long hair and can be created in just a few simple steps:
- Start by brushing your hair and dividing it into four equal sections, using either a comb or your fingers to create straight lines.
- Take each section and further divide it into smaller, equally sized sub-sections. You can adjust their size according to your preference, depending on the number of braids desired.
- Secure each sub-section with a rubber band near the scalp, forming a square pattern.
- Repeat this process with the remaining three sections, ensuring they remain symmetrical and neat.
- Now, select one sub-section from each section and braid it down to the ends. Secure each braid with another rubber band.
- Repeat this with all the sub-sections, resulting in four braids within each section.
- Gather all the braids at the top of your head and twist them into a bun. Customize the bun’s tightness to your liking.
- Secure the bun using bobby pins and apply a spritz of hairspray to keep it in place.
- To personalize the style, consider leaving some braids loose for a casual appearance or tucking them in for a more polished look.
You’ve now crafted a stunning square rubber band braids with bun hairstyle that will set you apart from the crowd, exuding elegance and style.
Heart-Shaped Rubber Band Braids
Heart rubber bands are a versatile hair accessory designed for creating various braid styles. These small elastic bands feature a heart-shaped loop on one end and a hook on the other. Using them is a breeze—simply hook one end of the band to a hair section, loop the other end around another section, and connect it back to the first, resulting in a heart-shaped braid. You can repeat this pattern along your hair’s length or combine it with other braids.
Heart rubber bands cater to all hair types and lengths and are available in a variety of colors and sizes. They offer a fun and effortless way to infuse some flair into your hairstyle.
Conclusion
In the world of little girl hairstyles, rubber bands are a secret weapon for both parents and hairstylists alike. These versatile accessories can transform ordinary hair into a canvas for creativity, offering an array of styling options that range from simple to intricate.
Whether you’re a parent looking for quick and easy school day looks or preparing your little one for a special occasion, “Little girl rubber band styles” provide endless inspiration. With a dash of imagination and a few colorful rubber bands, you can create hairstyles that not only showcase your child’s personality but also keep her looking adorable and confident. So, embrace the world of rubber band hairstyles and watch your little girl shine with her unique, stylish, and age-appropriate hairdos.